Saturday, June 30, 2012

Recycled Packaging Notebook

A few weeks ago I played around with Repurposed Packaging from Tim Holtz Compendium as part of a challenge.  I made a cute tag for the challenge but couldn't stop playing with the plastic and alcohol inks.  Today I wanted to show two other projects I made.

Both of these projects are made with plastic packaging- most of it from Tim Holtz products but any plastic packaging worlds as long as it is large enough for your die.
 This first object is a die cut of Sizzix Alterations Matchbook die.  This is the larger matchbook. 
I used a bone folder to fold the scored edges.
 The entire piece was colored with Alcohol Inks-Pool, Blue, and Picket Fence which is  opaque.  I dabbed the inks on the inside of the plastic so the outside would be shiny.
The butterflies and flower are rub ons.  I added the rub on letters to spell "FLY".  
The Seam binding was sprayed with Glimmer Mists and Distress Stains and dried in a tight  ball to keep the wrinkles 
I cut the notepaper to size and glued the top edge with Ranger Inkssentials Glue and Seal.  The back page was glue onto the plastic
 I hung a Philosophy Tag using an Idea-ology pin and used an Idea-ology clamp to keep the little notepad closed.

The second project used the Sizzix Pocket Envelope die.  
 Again I used a bone folder to fold the scored edges, applied alcohol inks- this time Picket Fence with Purples, and added more rub ons butterflies.
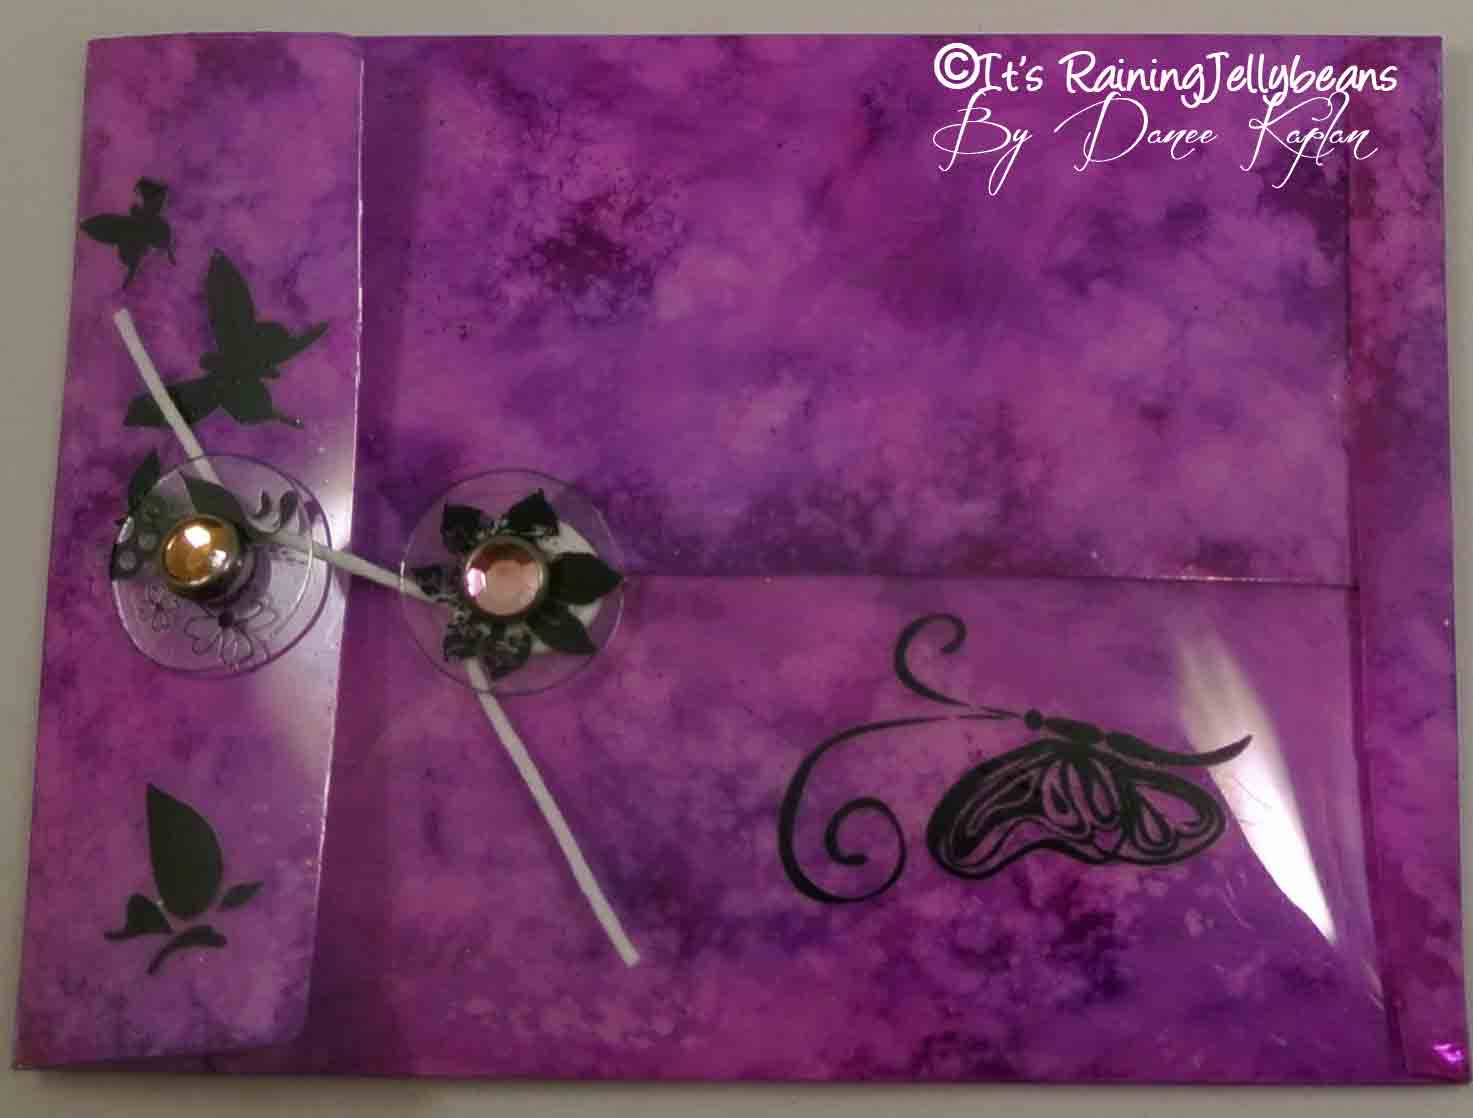
The die cuts two circles for the string to wrap around.  I applied rub ons to both of them to highlight them but kept them clear.  Finally I used a piece of string that came on a #5 shipping tag to wrap around the circles and keep the envelope closed.  

This project has been linked to the following Linky Parties:
Twigg Studios
Thirty Handmade Days
Embracing Change
Tutus and Tea Parties
Just Us Four
Etcetorize


Laters Baby….

Friday, June 29, 2012

Guest Post at Broken Treasures

Today I am blog posted at Broken Treasures.  Stop by to learn how to make the 3rd part of my Patriotic Garland.

Laters Baby….

Tuesday, June 26, 2012

4th of July Garland Part 2

My 4th of July AKA Patriotic garland is actually composed of 3 separate garlands and a strand of red, white and blue twinkle lights.

The first garland is this cupcake-wrapper flower garland.  You can read more about how easy this is to make here.

The 2nd part is a simple garland made using a package of glittered 4th of July die cuts and Divine Twine.  

I'm horrified to tell you that I cannot remember the brand of die cuts-I spent an hour Googling everything I could think of but no luck-  and I'm not at home to dig through my trash to find the package.   

However, you can use any type of die cuts or accent pieces for this project.  K & Company has two cute packages that would be perfect for a project like this.  
The twine is Air Mail Divine Twine…and it is Divine.  You can get it at Whisker Graphics; 240 yards for $15.  


I simply punched holes in the die cut pieces using a small hole punch, threaded the Divine Twine through the hole, tied each one in place with a single knot.  That is it. 
Part 3 will be on a guest post next week….

This post has been linked up to the following Linky Parties:
Tea Rose Home
Laters Baby….
Just Us Four

Sunday, June 24, 2012

Compendium Challenge Week 10

Don't you love when serendipity shines on you ?  If you have been following my participation in Studio L3's Compendium  of Curiosity Vol. 2 Challenge you may have noticed I didn't post anything for week 10….Ok,  most likely you didn't even give it a second thought….but I didn't….I was super busy with dance recital-then I was exhausted-and didn't get any crafting done…bummer right?  Here is where the serendipity occurs…. apparently Linda's week was even nuttier than mine and she is extending the week 10 project another week.  Score!

You know the drill….this project comes from Tim Holtz's Compendium of Curiosity Vol 2. available here (autographed) or at your local craft store.  This weeks project is Tissue Wrap Flowers page 37.  I will not be giving you the directions for making the flower in order to project Tim's intellectual property and revenue stream.

This week's challenge is sponsored by The Funkie Junkie Boutique. They are giving a $25 gift certificate to one randomly drawn winner. 
Keep a dozen Tissue Wrap Flowers on hand and you can easily and quickly put together a fabulous gift presentation.
I use seam binding on almost all my gifts because it is gorgeous and cheap.  Add a loopy sloppy bow and 3 flowers…..divine.  I get my seam biding from Zipper Stop.  They have both a website and an Etsy shop where they sell Snug Hug seam binding 100 yards for $9.50.  I keep a few of my favorite colors on hand; if I need another color, I dye it as described here.
I love how the delicate flowers add so much to a simple wrapping paper.  I bought a large roll of this paper to use for all sorts of birthdays and holidays.  By changing out the embellishments it is possible to use this stripe for anything from a man's birthday to Christmas to a Sweet Sixteen.  
Previously I showed Tissue Wrap Flowers on this years end-of-school teacher's gifts. 
But Tissue Wrap Flowers aren't just for packaging….
They look terrific on cards- granted you can't send them through the mail in a regular envelope but they are perfect for cards delivered by hand.

I love the addition of the big Jolee's Bling rhinestones but any added embellishment looks great.  Here I used a big flat-back pearl.  
 Just set Tissue Wrap Flowers around your house…. here I have them scattered in my Valentine's day decor.  They are so pretty and dainty.  There is something about Tim's Tissue Wrap…it is a waxy translucent tissue. I love it in the original color but you can color it with inks and stains. 
Tissue Wrap comes on a roll-in a box.  You get 26 feet for $15 and is available in these two patterns.  
This project is Linked to the following Linky Parties

Laters Baby….

Wednesday, June 20, 2012

4th of July Garland Part 1

I am all about the patriot this year.  I hate to even admit as the wife a Lt. Col that I never decorate for the 4th of July.  Somewhere between school ending and school starting the summer holidays just get ignored in my household.  But this year I really wanted to make some fun Patrotic decorations so I made the cute cupcake rosettes and "sparklers" you can find here.  I also made a fun garland that consists of 3 parts.  Today Part 1.
The "flowers" are simply cupcake wrappers-regualr and small- that I bunched up and glued with hot glue.  If you simply bunch up the center of each layer and add hot glue.. then the next-bunched up- layer you end up with a textured and fun flower.  I added 7-9 wrappers per flower.

The center is a 12x1 inch length of crepe paper.  I used Martha Stewart Fringing sheers to cut it into a fringe, rolled it up, snipped of the bottom to make it shorter and used hot glue to attach it.  You could start with a smaller width of crepe paper but the fringing sheers are hard to work with on small pieces so this worked better for me.  

While it is difficult to see in the pictures, I brushed Martha Stewart Glitter glue randomly on the edges of the cupcake wrappers and the tips of the center fringe and glittered with Martha Stewart Fine Crystal Glitter.   I like to keep my most-used glitter colors in plastic containers so I can just dip the item into the glitter and or scoop it with a spoon.  

The flowers were hot glued to a long length of white ribbon and small pieces of a silver metallic ribbon were added along the white ribbon for sparkle. 
If you have ever seen the work of or taken a class by Margie Aslett Romney, you might recognize this as a Junque Bow.  My life is forever changed by the Junque Bow.  I know how to tie perfect puffy bows and elegant Martha bows but there is just something about the fun and craziness of a Junque Bow.   Not to mention they sorta look like fireworks.
This project was Linked to the following Linky Parties

Laters Baby….

Monday, June 18, 2012

How to Make 4th of July "Sparklers"

I guest posted on Anna's My Life and Kids let week and here is the project that I made for her….

I am currently head-over-heels for Rosettes and more specifically…. prize ribbons.   
Literally…I cannot get enough of these things.  Here I used them as cupcake decorations along with the gold sparklers (tutorial below)
You could make all the prize ribbons the same…or vary them as I did here. 
You could use just the Sparklers or just the prize ribbons.
Before I can show you how to make the sparklers... we must discuss the cupcakes.
You see…I hope you NEVER serve your beloved family another BOX mix cake….ever….again.
And why would I DARE suggest this?  Because of Martha Stewart.  I know….I know….stay with me here.  Martha Stewart, the queen of all things domestic---- and usually complicated---has gifted the universe with One-Bowl Chocolate Cake.  It is as advertised…one bowl….a dump cake as it were. 
The recipe is available on her website: the cake and the cupcakes.  Please give it a try.  You will be surprised how easy it is and it tastes soooooo much better than any box mix I have ever tried.  You will then be able to brag that you made it from scratch! You don't have to share that it is as easy as a box mix. 
The magnificent tasting frosting is Brown Sugar Buttercream.  I admit that this is NOT as easy as opening a can but tastes like…you have died and gone to heaven.  It really doesn't compare…you will lick the spoon, the knife, your fingers, the bowl, the counter.


Excuse me as I step off my soap box….If you DO try either of these recipes, let me know what you thought of it…the experience, the taste, the look….


The Sparkler Tutorial:

This is so much easier than you would think.  First I will share my technique for getting small pieces of tinsel to add just the right amount of sparkle to all of your projects.


We begin with tinsel holiday garland; I’ve found it readily available for most holidays.  In fact, I actually bought a blue garland with red flags for this project but in the end I didn’t like the look of blue tinsel.  I raided my Christmas stash and grabbed this beautiful gold tinsel garland.


You will also need wooden skewers (these are BBQ skewers from the grocery store), hot glue, and wire cutters if you want to shorter the skewers.  That is it.
The garland is made up of the tinsel with a thin wire-or two- that run the length and keep it together.  You need to remove the wire in order to end up with a soft, pliable piece of tinsel.  All you need to do is grab about a few inches of garland on one end and pull….it will pull off of the wire.  Check the piece you pulled off for the wires and pull any of them out.  In the picture you can see the wire was easily removed from the 6 inch piece I pulled off and remains attached to the rest of the garland.  That wire is what holds the entire thing to gather and as you pull the wire out you are left with a pliable length of garland that can be pulled apart into smaller sections.  
Start with a 6-8 inch piece of wireless garland.
 Put a very small dot of hot glue at the tip of the skewer.
 Glue the end of your garland length to the top of the skewer.
 and twist the garland on down the skewer.
 when you reach the end scrunch the garland up towards the top. 

and glue with another small dot of hot glue.  You will need to fluff out the tinsel to get a better shape.
If you prefer you can make longer sparklers and use them in flower arrangements or other decorations .

Laters Baby….Danee